搭建自己的静态博客并自动部署
1. 概述
本文记录本博客(2026 年版)的搭建与自动部署方式:Hexo 源码、CI 工作流、站点发布都在同一个 GitHub 仓库里完成,push 后由 GitHub Actions 构建并通过官方 Pages Actions 上线。
| 部件 | 作用 |
|---|---|
| Hexo | 把 Markdown 文章编译为静态站点 HTML 文件(输出到 public/) |
| GitHub Pages | 托管静态站点并分配访问域名 |
| GitHub Actions | push 后自动执行构建与发布 |
当前环境(与仓库一致):
| 项目 | 说明 |
|---|---|
| Node.js | 20(CI 使用;本地可用同大版本或更高版本) |
| Hexo | 8.1.2 |
| 主题 | Fluid(npm 安装) |
| 仓库 | Jayant-Tang.github.io(单仓库) |
| 部署 | upload-pages-artifact + deploy-pages |
1.1 整体架构
1 | |
1.2 为什么用 GitHub Actions
如果只在本地写博客、手动 hexo g 再上传,会遇到:
- 硬盘损坏或换电脑时,文章与配置容易丢
- 多台电脑之间难以同步
- 每次发布都要本地构建,步骤重复
把 Hexo 项目放进 GitHub,并用 Actions 在云端构建发布,流程就变成:
1 | |
本仓库的 CI 还会同步变更文章到博客园(可选功能,见 docs/ARCHITECTURE.md)。下文先讲 Pages 发布的主线。
2. 搭建步骤
2.1 创建 GitHub 仓库并启用 Pages
-
注册 GitHub 账号。
-
分清 Pages 的两种访问路径:
类型 仓库名要求 访问地址示例 个人页(user site) <用户名>.github.iohttps://<用户名>.github.io/项目页(project site) 任意,如 bloghttps://<用户名>.github.io/blog/区别在 Hexo 的
url/root配置,见 2.5 节。 -
创建仓库。本博客使用个人页,仓库名为
Jayant-Tang.github.io,同时存放源码与发布配置。 -
打开 Settings → Pages,将 Build and deployment → Source 设为 GitHub Actions:
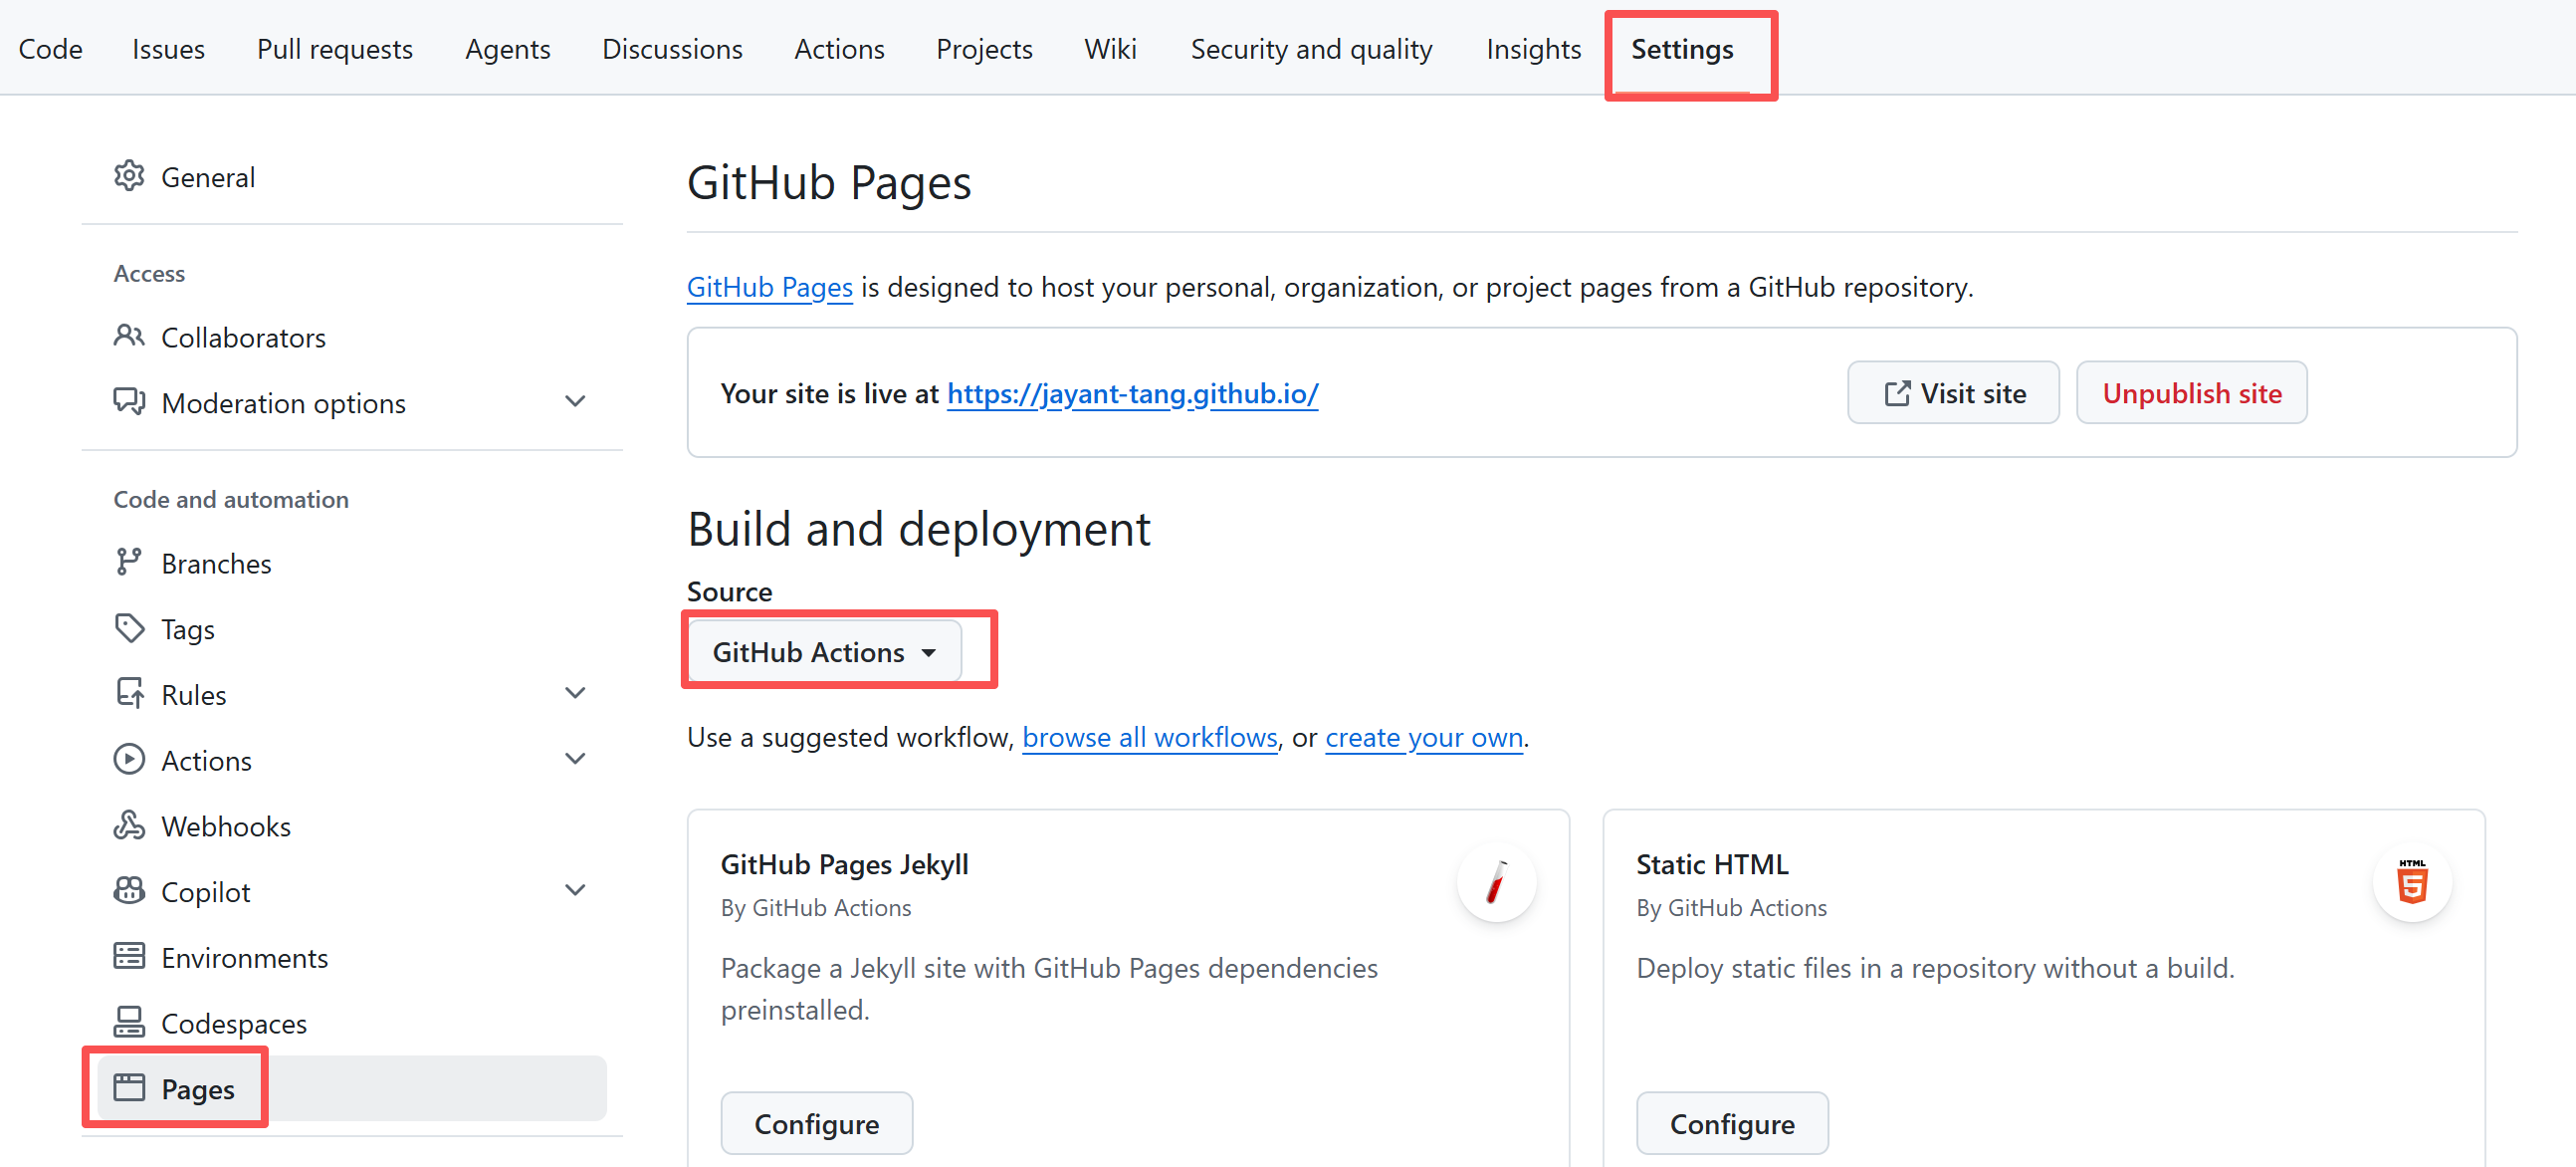
选 GitHub Actions 后,静态文件不会出现在某个分支的
/或/docs目录,而是由 workflow 上传构建产物(artifact)。工作流文件就位且成功运行后,Pages 才会显示站点地址。
2.2 本地安装与初始化 Hexo
安装依赖软件
Windows 安装 Node.js 时勾选 Add to PATH。然后全局安装 Hexo CLI:
1 | |
版本限制见 Hexo 文档。
初始化项目
1 | |
初始化后典型目录:
1 | |
顺序:先
hexo init,再git init。若目录里已有.git/,hexo init会失败。
本地预览
1 | |
终端出现 http://localhost:4000/ 即表示成功。Ctrl+C 停止服务。
本仓库在 package.json 中封装了脚本,等价命令为 npm run clean / npm run build / npm run server。
2.3 安装主题(Fluid)
Hexo 主题常见两种安装方式:
| 方式 | 适用场景 | 本博客 |
|---|---|---|
npm install hexo-theme-xxx |
主题发布在 npm | Fluid,采用此方式 |
git submodule 放到 themes/ |
主题只在 GitHub、未上 npm | 未使用 |
本博客使用 Fluid。安装步骤:
1 | |
把主题默认配置复制到站点根目录(由 Hexo 仓库管理,升级主题时不丢自定义项):
1 | |
修改 _config.yml 启用主题:
1 | |
Fluid 依赖的渲染器(如 hexo-renderer-markdown-it)会随 npm install 一并安装;若某主题文档要求额外包装,按文档 npm install ... --save 即可。
自定义外观、导航、评论等,改根目录的 _config.fluid.yml,不要只改 node_modules 里的文件(重装依赖会被覆盖)。
本地验证:
1 | |
若你选用的主题只提供 GitHub 仓库、没有 npm 包,再用
git submodule add <repo-url> themes/<主题名>。本仓库没有.gitmodules,主题也不靠 submodule 管理。
2.4 Fluid 扩展:左侧边栏与字数统计
Fluid 原生不支持文章页左侧的「公告 / 分类导航 / 工具链接」卡片,内置字数统计对中文也不友好。本仓库在 Hexo 根目录的 scripts/ 下放了两个插件脚本,无需改主题源码,Hexo 启动时会自动加载该目录下所有 .js 文件。
1 | |
2.4.1 左侧公告栏(theme_inject)
Fluid 提供 主题注入点(theme_inject)。
默认布局,页面左边有点空。通过注入 js 脚本fluid-left-sidebar.js 把自定义模板挂到文章页左侧:
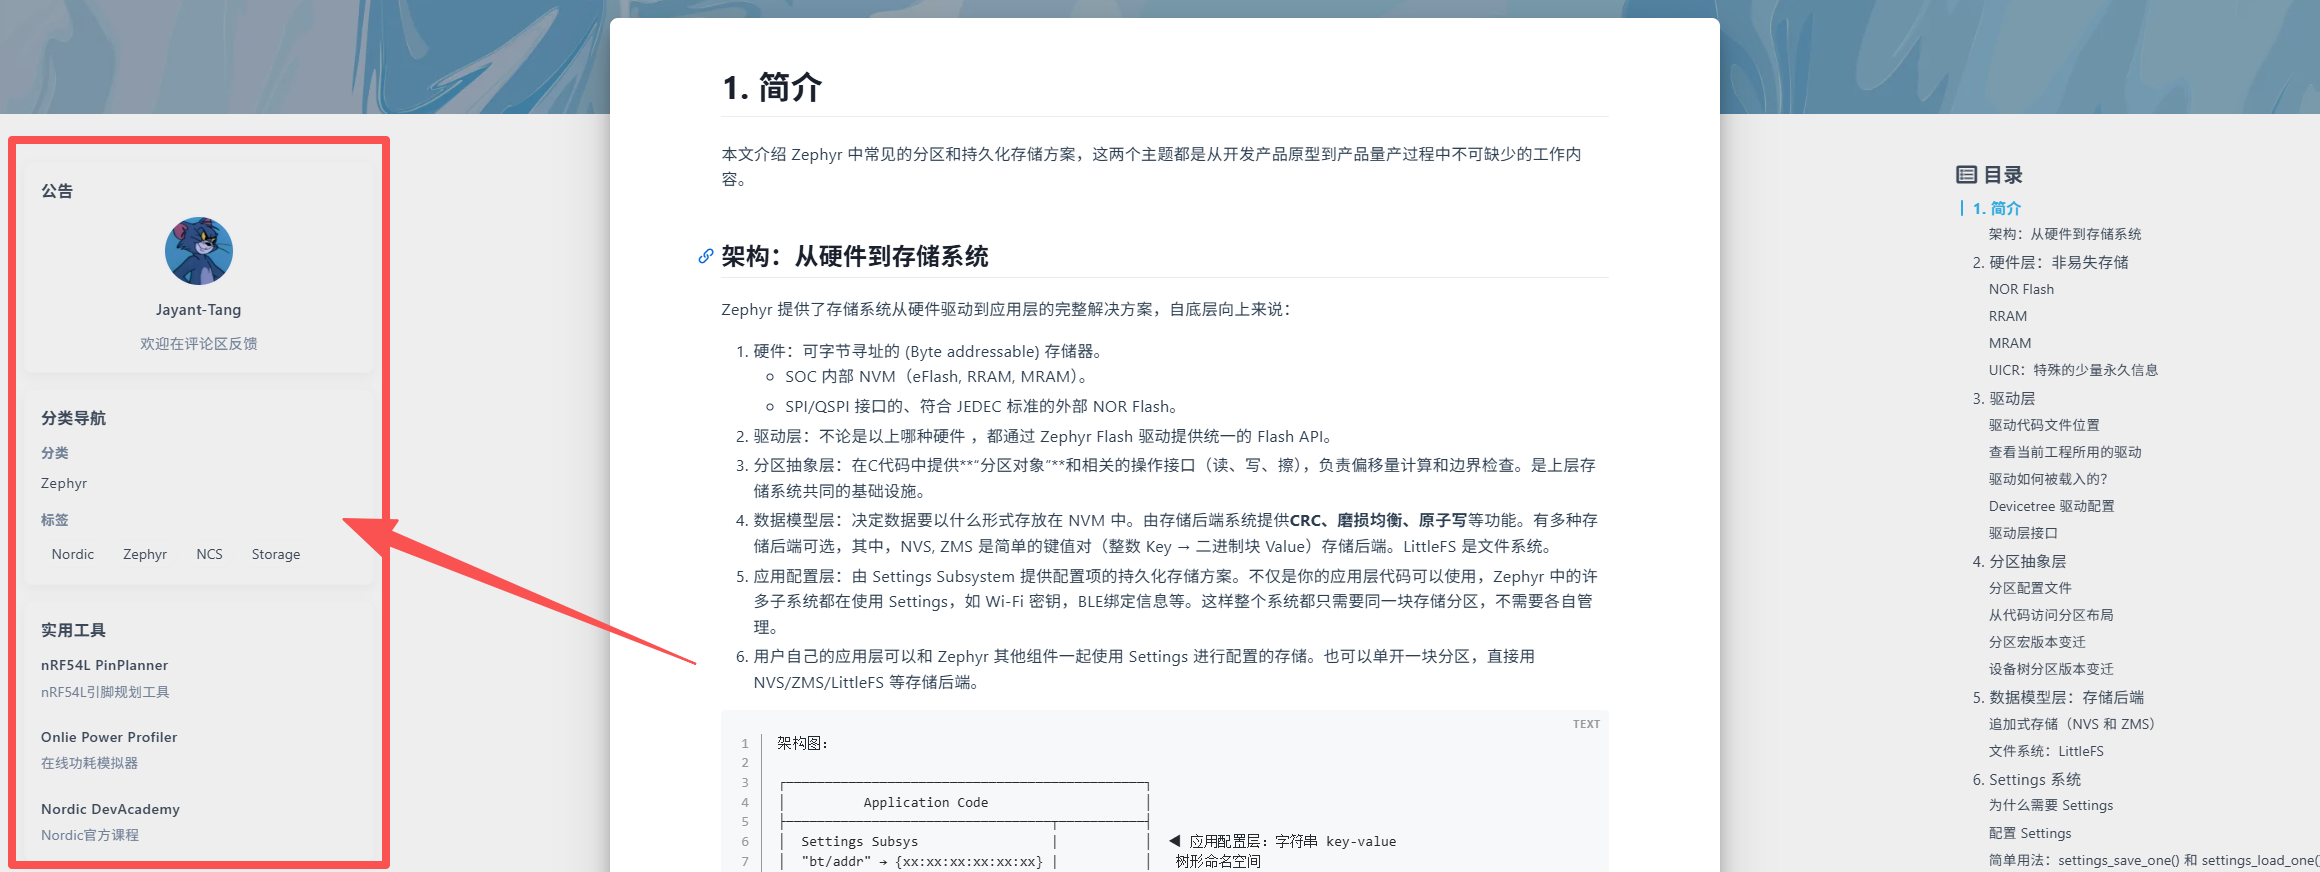
1 | |
完整文件见 scripts/fluid-left-sidebar.js;模板见 injects/post-left-sidebar.ejs。
injects/post-left-sidebar.ejs 读取 _config.fluid.yml 里的 left_sidebar 配置,可渲染四块内容(有数据才显示):
| 区块 | 配置键 | 作用 |
|---|---|---|
| 公告 | left_sidebar.notice |
头像、用户名、公告文字 |
| 分类导航 | left_sidebar.category_nav |
当前文章的分类树与标签 |
| 实用工具 | left_sidebar.tools |
外链列表 |
| 目录 | post.toc(placement: left 时) |
复用 Fluid 自带 TOC |
在 _config.fluid.yml 中启用并填写公告,例如:
1 | |
样式在 source/css/custom.css(类名以 custom-side- 开头),通过 custom_css 引入。本地 hexo s 打开任意文章即可预览左侧卡片。
2.4.2 修复字数统计(after_post_render)
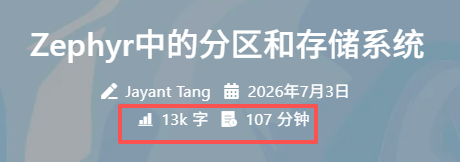
Fluid 默认按英文字母数量除以2进行统计,中文技术文章会严重偏大;代码块里的内容也会被算进去。
fix-wordcount.js 在文章渲染完成后重写 wordcount:
- 去掉
<pre><code>...</code></pre>代码块 - 剥离剩余 HTML
- 中文(CJK)按字符计,英文按单词计,连续数字按一段计
- 写回
data.wordcount,供 Fluid 的post.meta.wordcount与min2read使用
1 | |
完整实现见仓库 scripts/fix-wordcount.js。
在 _config.fluid.yml 打开字数与阅读时间,并按中文阅读速度调整参数:
1 | |
awl: 2 表示把内部计数值除以 2 再展示为「字」;wpm: 60 可按自己的阅读速度修改。改完后 hexo clean && hexo g 重新生成,文章页 meta 行的字数与「x 分钟阅读」应与正文体感一致。
2.5 配置站点 url 与 root
个人页(本博客):
1 | |
项目页(仓库名 blog 时):
1 | |
url 必须与浏览器最终访问地址一致;root 个人页为 /,项目页为 /<仓库名>/。配错会导致 CSS、图片、站内链接 404。
静态资源放在 source/ 下,生成后会出现在站点根路径。例如 source/imgs/a.png 在个人页对应 https://<域名>/imgs/a.png。
2.6 初始化 Git 并关联远程仓库
1 | |
确认 .gitignore 至少忽略这些内容(hexo init 会生成大部分):
1 | |
本仓库还忽略了 source/imgs/(图片走阿里云 OSS,见 3.3 节),若你希望图片随仓库一起发布,不要忽略该目录。
SSH 认证(推荐)
只需一对密钥,用于本机 git push,与 Pages 发布无关:
1 | |
官方 Pages Actions 不需要 Deploy Key,也不需要在 Secrets 里存放用于 hexo deploy 的私钥。
2.7 配置 GitHub Actions
在仓库根目录创建 .github/workflows/main.yml。下面是仅负责 Pages 发布的最小示例(与仓库内 完整工作流 相比,省略了博客园同步、npm 缓存、fetch-depth: 0、workflow_dispatch 等步骤):
1 | |
CI 执行顺序:
1 | |
提交并推送:
1 | |
在仓库 Actions 页查看运行结果;成功后 Settings → Pages 会显示站点 URL。
| 对比项 | 旧方案(hexo-deployer-git) | 当前方案 |
|---|---|---|
| 仓库 | 源码仓 + 独立 Pages 仓 | 单仓库 |
| 本地/CI 部署命令 | hexo deploy |
不需要;CI 只 hexo generate |
| Pages Source | Deploy from a branch | GitHub Actions |
| 额外密钥 | Deploy Key + Secret | 无(博客园同步另需 Secrets,见 ARCHITECTURE) |
完整工作流在 Pages 发布前还会:安装 Python 3.12、按变更文件同步博客园、回写元数据(contents: write)、缓存 node_modules。详见 docs/ARCHITECTURE.md。
3. 编写与发布文章
3.1 文章存放与新建
- 正式发布:
source/_posts/ - 草稿:
source/_drafts/
1 | |
会在 source/_posts/ 生成 <标题>.md,并根据 scaffolds/post.md 模板填入 Front-Matter。
3.2 Front-Matter
文件顶部 --- 之间的 YAML 区域,例如:
1 | |
本仓库的 scaffolds/post.md 已预置 Typora 图片路径和博客园同步字段,新建文章会自动带上。cnblogs.published 通常不需要写;只有文章不想同步到博客园时,才显式设置为 false。
各主题要求的字段不同;Fluid 常用 title、date、tags、categories、cover 等,见 _config.fluid.yml 与主题文档。
3.3 文章中的图片
方案一:云端图床(本博客线上用法)
利用 Typora编辑器 + PicGo 上传 + 阿里云对象存储服务(OSS)。
平时编写文章,粘贴图片时 Typora 自动拷贝到预设的图片目录。但本仓库 .gitignore 忽略了 source/imgs/。
文章发布前,在 Typora 中一键上传所有本地图片。Picgo 会全部上传到阿里云并获取 URL。
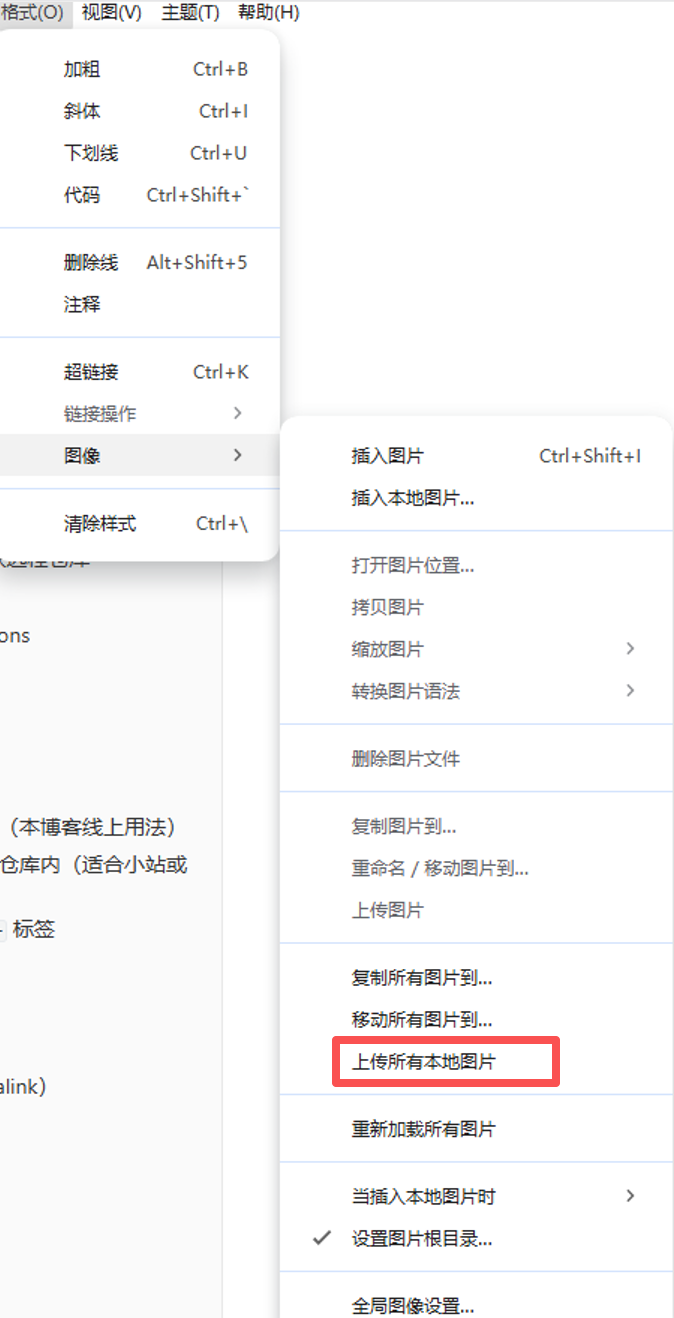
正文里直接写图片的 HTTPS 链接。这样图片本身不会占用 git 仓库体积,且加载速度极大提升。
方案二:图片放在仓库内(适合小站或入门)
把图片放在 source/imgs/...,Hexo 生成后可通过 /imgs/... 访问。
若用 Typora 写作,在 Front-Matter 中配置(本仓库 scaffolds/post.md 已包含):
1 | |
说明:
- 文章在
source/_posts/,./..指向source/,因此 Markdown 里可用/imgs/...路径 - 粘贴图片时 Typora 会复制到
source/imgs/<文章名>.assets/ - 若要让图片随 git 发布,不要把
source/imgs/写进.gitignore
3.4 发布文章
1 | |
push 后 Actions 自动构建并部署。不要在本地执行 hexo deploy(本仓库未配置 deploy 插件,也没有独立部署仓)。
4. 其他设置
4.1 文章与页面
- 文章(post):
source/_posts/,模板scaffolds/post.md - 独立页面(page):如关于页,用
hexo new page <名称>,模板scaffolds/page.md,生成在source/<名称>/index.md
归档、标签、分类等路径在 _config.yml 的 archive_dir、tag_dir、category_dir 中配置。
4.2 永久链接(Permalink)
默认 /:year/:month/:day/:title/ 在中文标题下 URL 过长。本博客使用哈希值作为文章链接:
1 | |
4.3 文章更新日期
Hexo 的 updated 默认取自文件 mtime(_config.yml 中 updated_option: 'mtime')。CI 在干净 checkout 上构建时,部分环境下 mtime 会变成拉取时刻,导致多篇显示同一更新时间。
处理方式(任选):
- 在 Front-Matter 里手写
updated: 2026-07-13 10:00:00 - 或将
_config.yml改为updated_option: 'date'(无updated时与date相同)
4.4 离线缓存(PWA)
本仓库通过 hexo-offline 生成 Service Worker,实现静态资源离线缓存。相关文件:
1 | |
hexo-offline 作为 npm 依赖安装后会自动参与 hexo generate;sw-update.js 在 _config.fluid.yml 的 custom_js 中引入。部署新版本后,访客再次打开站点时会自动加载最新页面,避免长期停留在旧缓存。
4.5 其他注意事项
- 文件名、标题、目录名避免空格(可用
-) - 评论使用 Giscus(GitHub Discussions);仓库需对访客可读,否则评论组件无法加载
- Front-Matter 中 YAML 的
key: value,冒号后要有空格 - 运维、博客园同步、Secrets 配置见仓库 docs/ARCHITECTURE.md
5. 博客园同步流程
本仓库除了发布到 GitHub Pages,还会在同一次 CI 中把变更文章同步到博客园。这个功能只针对 source/_posts/*.md 中新增或修改的文章;只改配置、主题、README 或其他页面时,不会触发博客园同步。
5.1 自动同步与首次映射回写
push 到 master 后,workflow 会先收集本次提交里变更的文章文件:
- 优先读取 GitHub push payload 中的
added/modified文件列表 - 如果 payload 没有完整文件列表,则回退到
git diff before..after -- source/_posts - 对中文文件名,命令使用
git -c core.quotepath=false ...,避免路径被转义成\346\220...后匹配失败
如果检测到文章变更,CI 会执行:
1 | |
如果文章还没有 cnblogs.postId,脚本会创建博客园文章,或按标题匹配唯一的已有文章。同步成功后只把稳定映射写回文章 Front-Matter:
1 | |
首次映射由 CI 自动提交,commit message 为:
1 | |
[skip ci] 用来避免回写提交再次触发构建循环。
文章已经有 postId 时,脚本会直接更新该 ID 对应的博客园文章,不再修改本地文件,也不会产生回写 commit。
5.2 什么时候不会同步
以下情况会跳过博客园同步:
- 本次 push 没有新增或修改
source/_posts/*.md - Front-Matter 中显式设置了
published: false - 或者设置了:
1 | |
cnblogs.published 通常不需要写;不写时默认允许同步。postId 是本地文章与博客园文章之间的唯一映射,也是后续执行更新而不是新建的依据。
5.3 手动补同步
如果某次 CI 因配置问题没有检测到文章变更,可以在 GitHub Actions 页面手动触发 workflow:
- 打开仓库 Actions → CI → Run workflow
cnblogs_action选择sync_changedtarget_paths填写需要同步的文章路径,例如:
1 | |
手动触发会使用同一套同步脚本。只有尚未建立映射的文章会回写 cnblogs 元数据;已有 postId 的文章更新后不会修改仓库。