在WSL2中搭建Matter CHIP Tool环境

1. 简介

本文介绍如何在Windows的WSL(Windows Subsystem for Linux)环境中搭建Matter CHIP Tool环境,无需开发者准备树莓派或原生Linux电脑。然后列举如何简单使用CHIP Tool对一台Matter设备进行测试。

阅读本文前,确保你掌握基本的Linux命令、网络、Docker知识。

目前仅测试了Matter Over Thread. 未测试Matter over Wi-Fi

如果你追求快速稳定搭建CHIP Tool,不在乎搭建树莓派或Linux PC的成本,请直接参考官方文档:

2. 前期准备

  • 一台Windows电脑,已安装WSL2 Ubuntu 24.04

    • 已经安装好USBIPD,可以把Windows的USB设备Attach到WSL中
    • 安装USBIPD的图形界面wsl-usb-manager,方便操作
  • 2个 Nordic nRF52840 Dongle

  • 一台用于测试的Matter设备,可以用烧录好Matter例程的开发板代替

  • 网络可访问DockerHub

注意:

  1. 如果你之前没装过WSL2,记得安装时考虑磁盘容量

  2. Windows家庭版默认不包含Hyper-V,需要自行搜索方式安装Hyper-V和WSL2

  3. 网络代理工具推荐开启Tun模式,这样才能代理WSL2内的网络

  4. 较老的WSL2 linux内核(5.x版本)可能并不包含bluetooth驱动,这里给出我的内核版本:

    1
    2
    $ uname -r
    6.6.87.2-microsoft-standard-WSL2

    如果你需要升级内核,在Windows中使用管理员权限运行Power Shell,执行:

    1
    wsl --update

3. 准备USB Dongle

烧录固件

准备Bluetooth USB dongle固件

你可以自己编译:

编译HCI USB固件:v3.1.0\zephyr\samples\bluetooth\hci_usb,板子选择nrf52840dongle/nrf52840

编译得到的app固件路径:build\hci_usb\zephyr\zephyr.hex

也可以用我编译好的:

hci_usb_52840dongle_app_v3.1.0.hex

准备Thread RCP固件

你可以自己编译:

编译Thread: Co-processor固件:v3.1.0\nrf\samples\openthread\coprocessor

编译得到的app固件路径:build\hci_usb\zephyr\zephyr.hex

也可以用我编译好的:

thread_rcp_52840dongle_app_v3.1.0.hex

给2个52840dongle烧录固件

按住reset按钮的同时,插入USB到电脑:

image-20250926003620850

观察到红色呼吸灯,说明在bootloader模式。

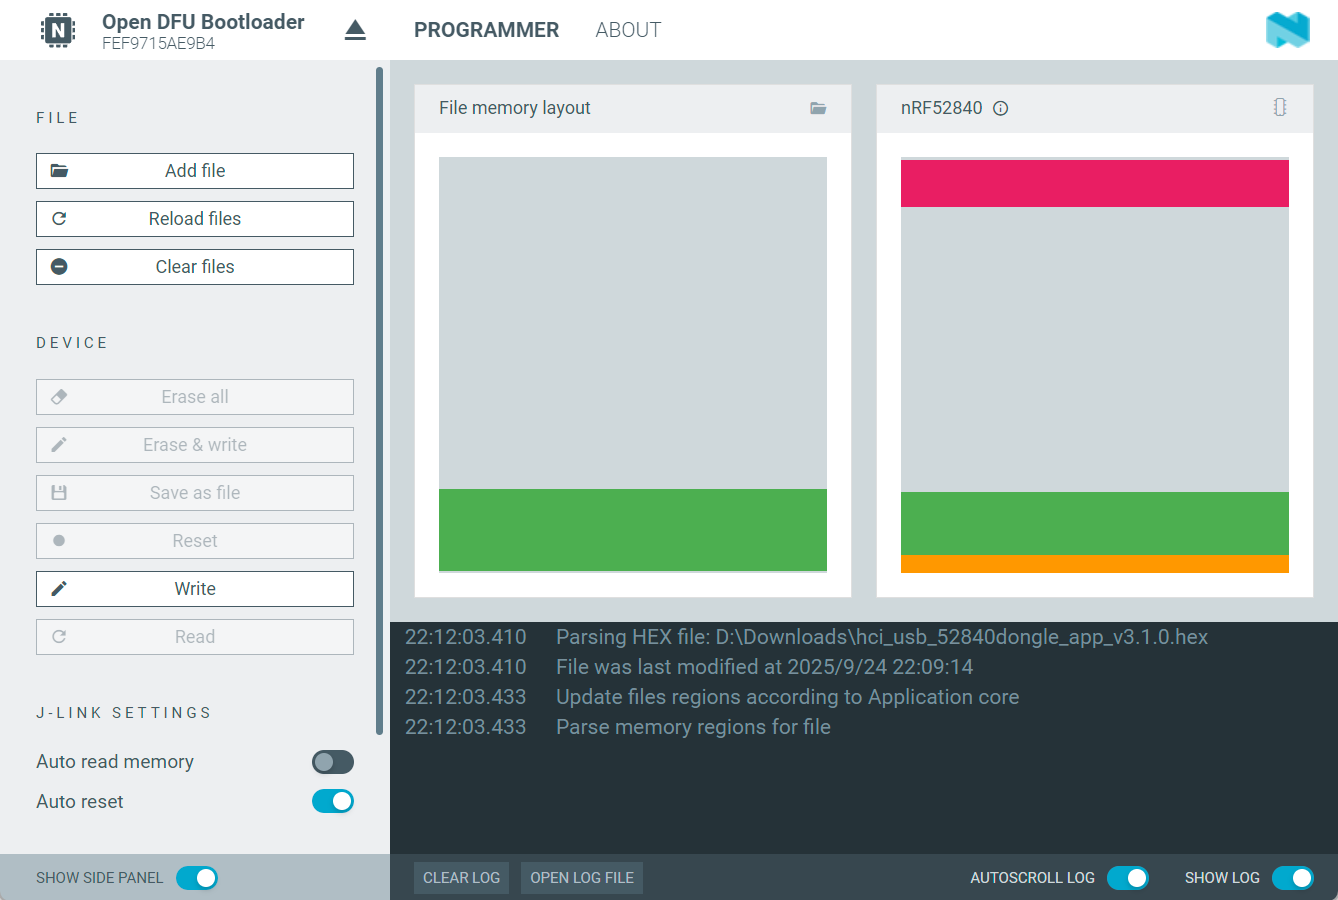
nRF Connect for Desktop的Programmer工具中,分别给2个dongle烧录前面的2个固件:

image-20250924221212147

把2个USB Dongle附着到WSL2

先在WSL2中安装依赖:

1
2
sudo apt update
sudo apt install bluez bluez-tools bluetooth usbutils

安装Nordic USB规则:

1
2
3
4
sudo apt install libusb-1.0-0

# download from https://github.com/NordicSemiconductor/nrf-udev/releases
sudo dpkg -i nrf-udev_1.0.1-all.deb

检查内核是否已经有开启蓝牙驱动,如果没有就加载这个内核模块:

1
2
3
lsmod | grep btusb

sudo modprobe btusb

目前的内核版本(6.6.87.2-microsoft-standard-WSL2)应该默认就已经开启了蓝牙驱动。

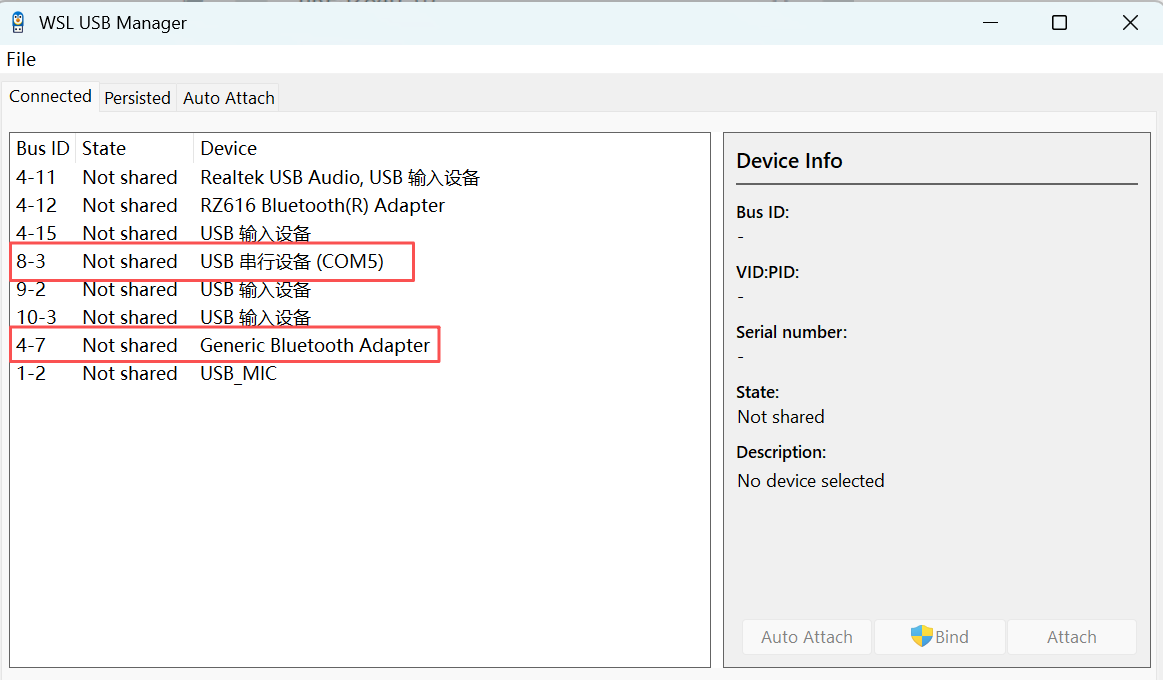
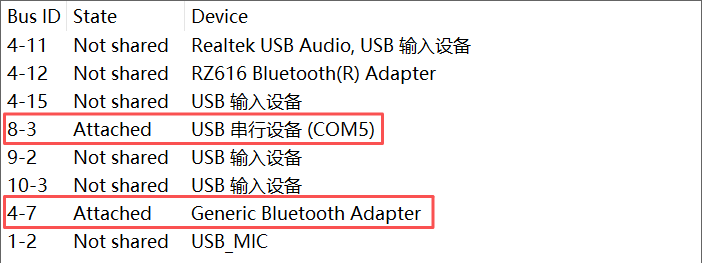
在Windows的WSL USB Manager中查看多出来的两个USB设备,右键点击,先bind,再Attach:

image-20250924221745107

image-20250924221849053

在WSL中检查:

1
2
3
4
5
$ lsusb
Bus 001 Device 001: ID 1d6b:0002 Linux Foundation 2.0 root hub
Bus 001 Device 002: ID 1915:0000 Nordic Semiconductor ASA Thread Co-Processor
Bus 001 Device 003: ID 2fe3:000b NordicSemiconductor USB-DEV
Bus 002 Device 001: ID 1d6b:0003 Linux Foundation 3.0 root hub

检查Thread串口tty是否出现:

1
2
$ ls /dev/ttyACM*
/dev/ttyACM0

然后检查蓝牙,你可以在bluetoothctl交互式命令中使用power on, list, scan on等进行测试,用exit退出:

1
2
3
4
5
6
7
8
9
10
11
12
13
14
15
16
17
18
19
20
21
22
23
24
25
26
27
28
29
30
$ hciconfig
hci0: Type: Primary Bus: USB
BD Address: 00:00:00:00:00:00 ACL MTU: 27:3 SCO MTU: 0:0
UP RUNNING
RX bytes:702 acl:0 sco:0 events:62 errors:0
TX bytes:381 acl:0 sco:0 commands:62 errors:0

$ bluetoothctl
Waiting to connect to bluetoothd...[bluetooth]# hci0 new_settings: powered bondable le secure-conn static-addr
[bluetooth]# Agent registered
[bluetooth]# [CHG] Controller C1:A2:0D:11:AE:6E Pairable: yes
[bluetooth]# list
Controller C1:A2:0D:11:AE:6E DESKTOP-KLNH3ME [default]
[bluetooth]# power on
[bluetooth]# Changing power on succeeded
[bluetooth]# scan on
[bluetooth]# SetDiscoveryFilter success
[bluetooth]# Discovery started
[bluetooth]# [CHG] Controller C1:A2:0D:11:AE:6E Discovering: yes
[bluetooth]# [NEW] Device 6C:EC:A5:98:63:AD 6C-EC-A5-98-63-AD
[bluetooth]# [NEW] Device D5:B7:10:B1:20:21 HB7930785605
[bluetooth]# [NEW] Device 7A:10:6A:1A:36:14 7A-10-6A-1A-36-14
[bluetooth]# [NEW] Device 68:D0:F4:5C:F6:F9 68-D0-F4-5C-F6-F9
[bluetooth]# [NEW] Device 24:F1:50:56:37:10 24-F1-50-56-37-10
[bluetooth]# [NEW] Device 26:F1:C5:BB:E7:3D 26-F1-C5-BB-E7-3D
[bluetooth]# [NEW] Device 44:48:FF:76:DA:F3 U-BACDAF2
[bluetooth]# [NEW] Device A0:99:21:05:6A:D5 midea
......
......
[bluetooth]# exit

4. 准备CHIP Tool可执行文件

推荐直接下载Nordic编译好的可执行文件:Releases · nrfconnect/sdk-connectedhomeip

如果你想自己编译,参考:CHIP Tool for Linux or macOS

下载好可执行文件chip-tool_x64,重命名为chip-tool,添加到PATH环境变量,并用chmod a+x chip-tool增加可执行权限。

确保你可以执行chip-tool即可。

5. 安装OTBR Docker

官方文档:Running OTBR using Docker

安装依赖

1
2
sudo apt update
sudo apt install avahi-daemon avahi-utils docker.io

注:avahi-daemon和avahi-utils是官方文档没有提到,并且WSL2中缺少的。它负责mDNS功能。

配置otbr网络

1
2
3
4
5
# Start the Docker daemon
sudo systemctl start docker

# Create an IPv6 network for the OpenThread Border Router container in Docker
sudo docker network create --ipv6 --subnet fd11:db8:1::/64 -o com.docker.network.bridge.name=otbr0 otbr

拉取镜像

注意镜像版本(fbde28a)要和官方文档最新版本一致:

1
docker pull nrfconnect/otbr:fbde28a

检查拉取的镜像:

1
2
3
docker image ls
REPOSITORY TAG IMAGE ID CREATED SIZE
nrfconnect/otbr fbde28a 62c4237aa6f4 11 months ago 1.49GB

运行容器

在运行之前,确保内核加载了ipv6功能:

1
sudo modprobe ip6table_filter

这里只是一次性加载,每次重启WSL后都要执行重新加载

运行容器:

1
2
3
sudo docker run -it --rm --privileged --name otbr --network otbr -p 8080:80 \
--sysctl "net.ipv6.conf.all.disable_ipv6=0 net.ipv4.conf.all.forwarding=1 net.ipv6.conf.all.forwarding=1" \
--volume "/dev/ttyACM0:/dev/radio" nrfconnect/otbr:fbde28a --radio-url "spinel+hdlc+uart:///dev/radio?uart-baudrate=1000000"
  • 这个容器名称是otbr,使用的网络名称也叫otbr,是前面创建的
  • --rm参数会让这个容器在停止时自动被删除,无需手动清理
  • 命令中的/dev/ttyACM0就是附着到WSL2中的Thread RCP。如果你的串口号不一样记得修改。
  • 相比于官方文档,这里部分参数我加了引号",这样才能让zsh等shell正常执行。

容器运行时会占用shell终端,可以先按Ctrl+P,松开,再按Ctrl+Q,让容器去后台运行。

你也可以在运行时直接加上-d参数,这样一开始docker就会在后台运行。

后台运行的话,可以用docker logs otbr查看历史日志。

这里介绍一些docker快捷键:

快捷键 作用 说明
Ctrl+P, Ctrl+Q 脱离容器但不停止 最常用
Ctrl+C 停止容器 发送 SIGTERM 信号
Ctrl+Z 暂停容器 发送 SIGTSTP 信号
Ctrl+D 退出容器 如果使用 docker exec 进入

设置Thread网络

方式一:本地网页开启Thread网络

OTBR容器会开启一个网页服务器,用浏览器访问 http://localhost:8080/

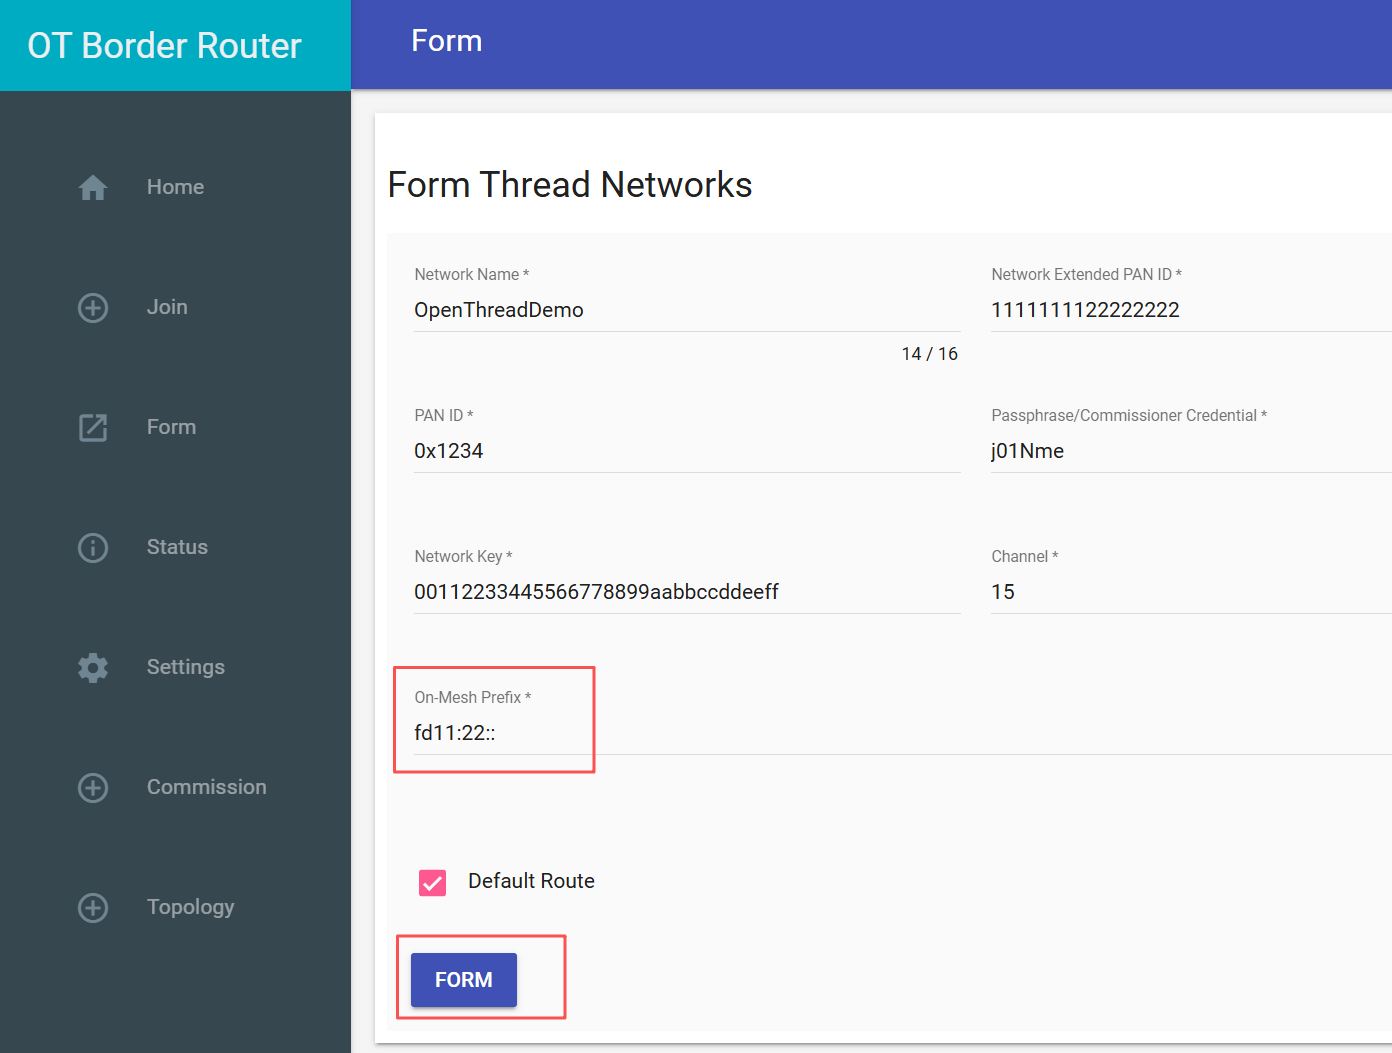
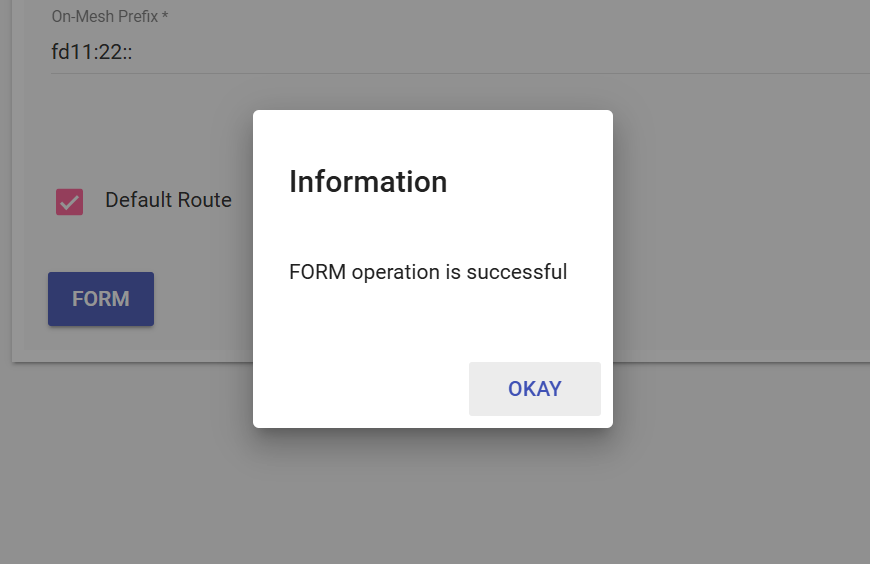
在Form页面,记下On-Mesh Prefix,然后点击FORM开启网络:

image-20250924234615593

image-20250924234632166

检查Thread网络状态:

1
2
3
4
5
6
sudo docker exec -it otbr sh -c "sudo service otbr-agent status"
* otbr-agent is running

sudo docker exec -it otbr sh -c "sudo ot-ctl state"
leader
Done

方式二:命令开启Thread网络

1
2
3
4
5
6
7
8
9
10
11
12
13
14
15
16
17
18
19
20
21
22
# create new dataset
docker exec otbr ot-ctl dataset init new

# check new dataset
docker exec otbr ot-ctl dataset

# commit this dataset
docker exec otbr ot-ctl dataset commit active

# Start network
docker exec otbr ot-ctl ifconfig up
docker exec otbr ot-ctl thread start

# wait for about 7s
sleep 7

# check network state
docker exec -it otbr sh -c "sudo ot-ctl state"

# Set On-Mesh prefix: fd11:22::/64
docker exec -it otbr ot-ctl prefix add fd11:22::/64 paos
docker exec -it otbr ot-ctl netdata register

添加路由规则

我们希望让chip-tool向Thread网络内的地址发出的IPv6 UDP包能被正确路由。

这里要用到上一步记住的On-Mesh Prefix,假设是fd11:22::/64,添加路由:

1
sudo ip -6 route add fd11:22::/64 dev otbr0 via fd11:db8:1::2

这是一次性添加,每次重启WSL后要重新执行

检查路由表是否成功添加:

1
2
3
4
5
6
ip -6 route
fd11:22::/64 via fd11:db8:1::2 dev otbr0 metric 1024 pref medium
fd11:db8:1::/64 dev otbr0 proto kernel metric 256 pref medium
fe80::/64 dev eth0 proto kernel metric 256 pref medium
fe80::/64 dev veth2f60c62 proto kernel metric 256 pref medium
fe80::/64 dev otbr0 proto kernel metric 256 pref medium

可以看到第一行的路由规则,所有发往fd11:22::/64的数据包,都将被路由到otbr0网卡。如果你发现重启后这一条没了,就再次执行前面的命令。

6. CHIP Tool运行测试

本节只介绍通过ble配网Matter over Thread设备。更多方式请参考官方文档:Using CHIP Tool for Matter device testing

找一个开发板,编译并烧录Matter: Light bulb例程(nrf\samples\matter\light_bulb),运行,查看串口日志:

1
2
3
4
5
6
7
8
9
10
11
12
13
14
15
16
17
18
19
...
...
I: 238 [DL]Device Configuration:
I: 241 [DL] Serial Number: 11223344556677889900
I: 245 [DL] Vendor Id: 65521 (0xFFF1)
I: 249 [DL] Product Id: 32773 (0x8005)
I: 252 [DL] Product Name: not-specified
I: 256 [DL] Hardware Version: 0
I: 259 [DL] Setup Pin Code (0 for UNKNOWN/ERROR): 20202021
I: 264 [DL] Setup Discriminator (0xFFFF for UNKNOWN/ERROR): 3840 (0xF00)
I: 271 [DL] Manufacturing Date: 2022-01-01
I: 275 [DL] Device Type: 65535 (0xFFFF)
I: 278 [SVR]SetupQRCode: [MT:6FCJ142C00KA0648G00]
I: 283 [SVR]Copy/paste the below URL in a browser to see the QR Code:
I: 289 [SVR]https://project-chip.github.io/connectedhomeip/qrcode.html?data=MT%3A6FCJ142C00KA0648G00
I: 298 [SVR]Manual pairing code: [34970112332]
E: 302 [DL]Long dispatch time: 258 ms, for event type 2
I: 309 [DL]CHIPoBLE advertising started
I: 313 [DL]NFC Tag emulation started

灯泡这个例程是开机自动开启配网广播的,不需要操作。

记录下Pin Code: 20202021Discriminator: 3840

获取当前Thread网络密钥

1
sudo docker exec -it otbr sh -c "sudo ot-ctl dataset active -x"

例如:

1
2
3
sudo docker exec -it otbr sh -c "sudo ot-ctl dataset active -x"
0e0800000000000100004a0300001435060004001fffe00708fdc22a566b13a4e10c0402a0f7f8051000112233445566778899aabbccddeeff030e4f70656e54687265616444656d6f0410445f2b5ca6f2a93a55ce570a70efeecb000300000f0208111111112222222201021234
Done

注意每次重启Docker容器,密钥都会发生微小的变化。记得重新获取。

设备入网

1
chip-tool pairing ble-thread <node_id> hex:<operational_dataset> <pin_code> <discriminator>
  • node_id:用户自定义的一个正整数id,代表当前要绑定的设备
  • hex:<operational_dataset>:Thread网络密钥
  • <pin_code>:设备的pin code
  • <discriminator>:设备的discriminator

例如:

1
2
chip-tool pairing ble-thread 0x101 hex:0e08000000000001000000030000114a0300001635060004001fffe00208f238904e09085f280708fdf0b133259ede240510499ab47780ab5caa763e9137e92acfa5030f4f70656e5468726561642d37313734010271740410d15cae05d12237c4be2c167faea01e5c0c0402a0f7f8 20202021 3840 --bypass-attestation-verifier true 

注:这里使用--bypass-attestation-verifier true 跳过了证书验证。各种测试证书、生产的正式证书设置不在本文讨论范围。

最终没有错误日志输出,即可说明配网成功:

1
2
3
4
5
6
7
8
9
10
11
12
13
14
15
16
17
18
19
20
21
22
23
24
25
26
27
28
29
30
31
32
33
34
35
36
37
38
39
40
41
42
43
44
45
46
47
48
49
......
[1758729999.505] [6784:6786] [CTL] Successfully finished commissioning step 'SendComplete'
[1758729999.505] [6784:6786] [CTL] Commissioning stage next step: 'SendComplete' -> 'Cleanup'
[1758729999.505] [6784:6786] [CTL] Performing next commissioning step 'Cleanup'
[1758729999.505] [6784:6786] [CTL] Successfully finished commissioning step 'Cleanup'
[1758729999.505] [6784:6786] [DIS] Closing all BLE connections
[1758729999.505] [6784:6786] [IN] Clearing BLE pending packets.
[1758729999.505] [6784:6786] [BLE] Auto-closing end point's BLE connection.
[1758729999.505] [6784:6786] [DL] Closing BLE GATT connection (con 0x74aa1c024530)
[1758729999.505] [6784:6785] [DL] Close BLE connection: peer=DE:4A:50:3D:16:29
[1758729999.661] [6784:6786] [IN] SecureSession[0x74aa140054c0]: MarkForEviction Type:1 LSID:14320
[1758729999.661] [6784:6786] [SC] SecureSession[0x74aa140054c0, LSID:14320]: State change 'kActive' --> 'kPendingEviction'
[1758729999.661] [6784:6786] [IN] SecureSession[0x74aa140054c0]: Released - Type:1 LSID:14320
[1758729999.661] [6784:6786] [CTL] Commissioning complete for node ID 0x0000000000000101: success
[1758729999.662] [6784:6786] [TOO] Device commissioning completed with success
[1758729999.662] [6784:6785] [DL] BLE connection closed: conn=0x74aa1c024530
[1758729999.662] [6784:6786] [DMG] ICR moving to [AwaitingDe]
[1758729999.662] [6784:6786] [EM] <<< [E:35636i S:14321 M:191290806 (Ack:148794768)] (S) Msg TX from 000000000001B669 to 1:0000000000000101 [5CA5] [UDP:[fd11:22::ae46:4779:ebf3:9b3b]:5540] --- Type 0000:10 (SecureChannel:StandaloneAck) (B:34)
[1758729999.662] [6784:6786] [EM] Flushed pending ack for MessageCounter:148794768 on exchange 35636i
[1758729999.662] [6784:6786] [DL] HandlePlatformSpecificBLEEvent 16390
[1758729999.662] [6784:6786] [BLE] No endpoint for unsubscribe complete
[1758729999.662] [6784:6786] [BLE] No endpoint for connection error
[1758729999.662] [6784:6784] [CTL] Shutting down the commissioner
[1758729999.662] [6784:6784] [PAF] WiFiPAF: Closing all WiFiPAF sessions to shutdown
[1758729999.662] [6784:6784] [CTL] Shutting down the controller
[1758729999.662] [6784:6784] [IN] Expiring all sessions for fabric 0x1!!
[1758729999.662] [6784:6784] [IN] SecureSession[0x74aa1400e6f0]: MarkForEviction Type:2 LSID:14321
[1758729999.662] [6784:6784] [SC] SecureSession[0x74aa1400e6f0, LSID:14321]: State change 'kActive' --> 'kPendingEviction'
[1758729999.662] [6784:6784] [IN] SecureSession[0x74aa1400e6f0]: Released - Type:2 LSID:14321
[1758729999.662] [6784:6784] [FP] Forgetting fabric 0x1
[1758729999.662] [6784:6784] [TS] Pending Last Known Good Time: 2023-10-14T01:16:48
[1758729999.662] [6784:6784] [TS] Previous Last Known Good Time: 2023-10-14T01:16:48
[1758729999.662] [6784:6784] [TS] Reverted Last Known Good Time to previous value
[1758729999.662] [6784:6784] [CTL] Shutting down the commissioner
[1758729999.662] [6784:6784] [PAF] WiFiPAF: Closing all WiFiPAF sessions to shutdown
[1758729999.662] [6784:6784] [CTL] Shutting down the controller
[1758729999.662] [6784:6784] [CTL] Shutting down the System State, this will teardown the CHIP Stack
[1758729999.662] [6784:6784] [DMG] All ReadHandler-s are clean, clear GlobalDirtySet
[1758729999.662] [6784:6784] [FP] Shutting down FabricTable
[1758729999.662] [6784:6784] [TS] Pending Last Known Good Time: 2023-10-14T01:16:48
[1758729999.662] [6784:6784] [TS] Previous Last Known Good Time: 2023-10-14T01:16:48
[1758729999.662] [6784:6784] [TS] Reverted Last Known Good Time to previous value
[1758729999.666] [6784:6784] [DL] Wrote settings to /tmp/chip_counters.ini
[1758729999.666] [6784:6784] [DL] NVS set: chip-counters/total-operational-hours = 0 (0x0)
[1758729999.666] [6784:6784] [DL] Inet Layer shutdown
[1758729999.666] [6784:6784] [DL] BLE Layer shutdown
[1758729999.666] [6784:6784] [DL] WiFi-PAF Layer shutdown
[1758729999.666] [6784:6784] [PAF] WiFiPAF: Closing all WiFiPAF sessions to shutdown
[1758729999.666] [6784:6784] [DL] System Layer shutdown

控制设备测试

比如控制led亮灭:

1
chip-tool onoff toggle <node_id> <endpoint_id>
  • node_id:前面配网时,用户自己分配的一个正数ID
  • endpoint_id:onoff这个功能所在的endpoint。这个取决于设备端的Matter Cluster配置(使用zap-tool配置)

例如:

1
chip-tool onoff toggle 0x101 1

反复执行此命令,能观察到开发板上led亮灭。

至此,chip-tool搭建成功。

7. 自动化脚本

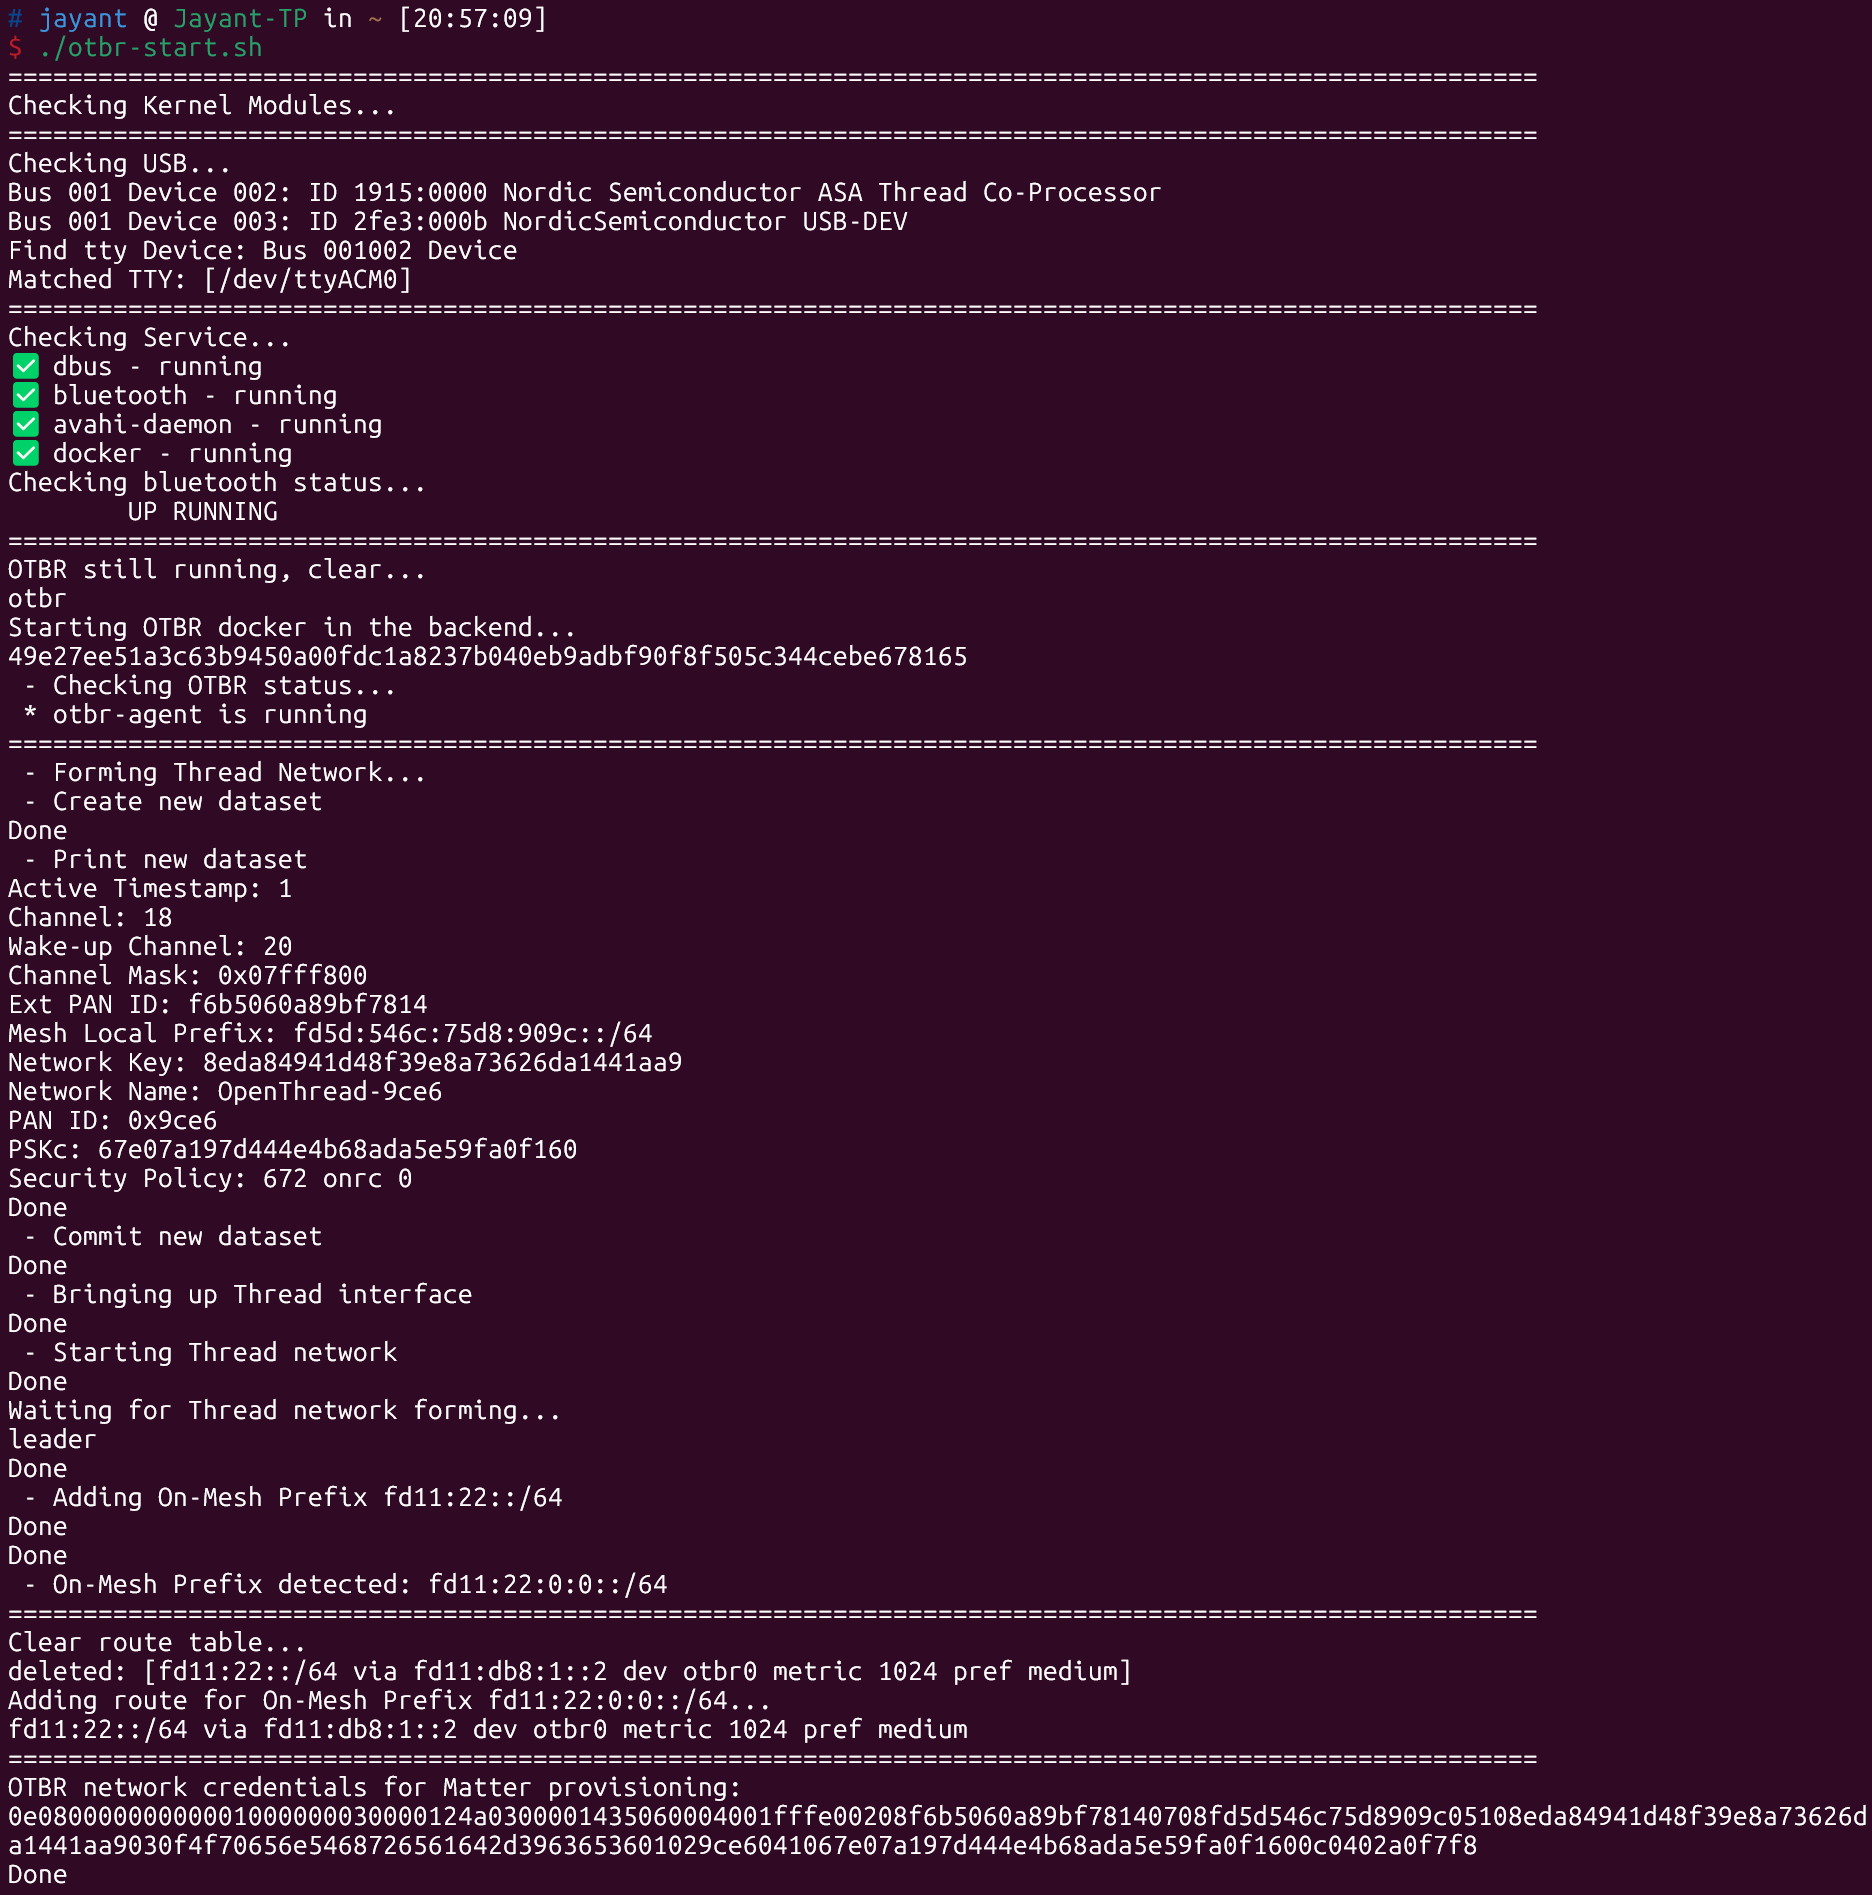
每次重启电脑都要重新开一遍OTBR太麻烦,这里给出一个自动化脚本:
image-20251001205804868

包含:

  • 硬件、内核驱动、服务检查
  • 开启OTBR docker
  • 自动FORM Thread网络
  • 自动设置On-Mesh prefix
  • 自动设置路由表
  • 自动获取Thread网络密钥

otbr-start.sh:

1
2
3
4
5
6
7
8
9
10
11
12
13
14
15
16
17
18
19
20
21
22
23
24
25
26
27
28
29
30
31
32
33
34
35
36
37
38
39
40
41
42
43
44
45
46
47
48
49
50
51
52
53
54
55
56
57
58
59
60
61
62
63
64
65
66
67
68
69
70
71
72
73
74
75
76
77
78
79
80
81
82
83
84
85
86
87
88
89
90
91
92
93
94
95
96
97
98
99
100
101
102
103
104
105
106
107
108
109
110
111
112
113
114
115
116
117
118
119
120
121
122
123
124
125
126
127
128
129
130
131
132
133
134
135
136
137
138
139
140
141
142
143
144
145
146
147
148
149
150
151
152
153
154
155
156
157
158
159
160
161
162
#!/bin/sh

# from Thread RCP USB Dongle
# Nordic VID:PID = 1915:0000
VID="1915"
PID="0000"

## dependency check
echo ======================================================================================================
echo "Checking Kernel Modules..."
lsmod | grep -q btusb
if [ $? -ne 0 ]; then
sudo modprobe btusb
fi
lsmod | grep -q ip6table_filter
if [ $? -ne 0 ]; then
sudo modprobe ip6table_filter
fi

echo ======================================================================================================
echo "Checking USB..."
lsusb | grep "Thread Co-Processor"
if [ $? -ne 0 ]; then
echo "No Nordic Thread RCP device found. Please plug in the device and try again."
exit 1
fi
lsusb | grep "NordicSemiconductor USB-DEV"
if [ $? -ne 0 ]; then
echo "No Nordic BLE device found. Please plug in the device and try again."
exit 1
fi

# find Thread RCP tty
bus_device=$(lsusb | grep "$VID:$PID" | awk '{print $2":"$4}' | sed 's/://' | sed 's/$//')

if [ -n "$bus_device" ]; then
bus=$(echo "$bus_device" | cut -d':' -f1)
device=$(echo "$bus_device" | cut -d':' -f2)
echo "Find tty Device: Bus $bus Device $device"

for otrcp_tty in /dev/ttyACM*; do
if [ -e "$otrcp_tty" ]; then
tty_name=$(basename "$otrcp_tty")

udev_info=$(udevadm info --name="$otrcp_tty" --query=property)

if echo "$udev_info" | grep -q "ID_VENDOR_ID=$VID" && echo "$udev_info" | grep -q "ID_MODEL_ID=$PID"; then
echo "Matched TTY: [$otrcp_tty]"
found=1
fi
fi
done

if [ $found -eq 0 ]; then
echo "USB exists, but no corresponding ttyACM interface found."
exit 1
fi
else
echo "No USB device found with VID:PID = $VID:$PID"
exit 1
fi

echo ======================================================================================================
echo "Checking Service..."
services="dbus bluetooth avahi-daemon docker"
for service in $services; do
if systemctl is-active --quiet "$service"; then
echo "✅ $service - running"
else
echo "❌ $service - stopped"
fi
done

echo "Checking bluetooth status..."
hciconfig | grep "UP RUNNING"
if [ $? -ne 0 ]; then
echo "BLE HCI dongle not working"
exit 1
fi

echo ======================================================================================================
## Checking OTBR docker
docker ps --filter="name=otbr" | grep -q "otbr"
if [ $? -eq 0 ]; then
echo "OTBR still running, clear..."
docker stop otbr
while docker ps -a --filter "name=otbr" | grep -q "otbr"; do
sleep 1
done
fi

## Starting OTBR docker
echo "Starting OTBR docker in the backend..."

# add `-d` to run container in the background
# add `--rm` to auto-remove container when it stops
sudo docker run -it --rm -d --privileged --name otbr --network otbr -p 8080:80 \
--sysctl "net.ipv6.conf.all.disable_ipv6=0 net.ipv4.conf.all.forwarding=1 net.ipv6.conf.all.forwarding=1" \
--volume $otrcp_tty:/dev/radio nrfconnect/otbr:fbde28a --radio-url spinel+hdlc+uart:///dev/radio?uart-baudrate=1000000

sleep 4

echo " - Checking OTBR status..."
docker exec -it otbr sh -c "sudo service otbr-agent status"

## Form the Thread Network
echo ======================================================================================================
echo " - Forming Thread Network..."
set -e

echo " - Create new dataset"
docker exec -it otbr ot-ctl dataset init new

echo " - Print new dataset"
docker exec -it otbr ot-ctl dataset

echo " - Commit new dataset"
docker exec -it otbr ot-ctl dataset commit active

echo " - Bringing up Thread interface"
docker exec -it otbr ot-ctl ifconfig up

echo " - Starting Thread network"
docker exec -it otbr ot-ctl thread start

echo "Waiting for Thread network forming..."
sleep 7
docker exec -it otbr sh -c "sudo ot-ctl state"

# Add On-Mesh Prefix after network is formed
echo " - Adding On-Mesh Prefix fd11:22::/64"
docker exec -it otbr ot-ctl prefix add fd11:22::/64 paos
docker exec -it otbr ot-ctl netdata register

# Wait a bit for prefix propagation
sleep 3

# Get the actual On-Mesh Prefix
onmesh_prefix=$(docker exec -it otbr ot-ctl prefix | grep "paos" | awk '{print $1}' | tr -d '\r')
echo " - On-Mesh Prefix detected: $onmesh_prefix"

set +e

## Configuring route table
GATEWAY=$(docker inspect -f '{{range .NetworkSettings.Networks}}{{.GlobalIPv6Address}}{{end}}' otbr)
echo ======================================================================================================

echo "Clear route table..."
ip -6 route show | grep "via $GATEWAY dev" | while read route; do
echo "deleted: [$route]"
sudo ip -6 route del $route
done

echo "Adding route for On-Mesh Prefix $onmesh_prefix..."
sudo ip -6 route add $onmesh_prefix dev otbr0 via $GATEWAY

ip -6 route show | grep "via $GATEWAY dev"

echo ======================================================================================================
echo "OTBR network credentials for Matter provisioning:"
docker exec otbr sh -c "sudo ot-ctl dataset active -x"

8. 已知问题

目前,通过USBIPD把2个USB Dongle附着到WSL中似乎已经是极限带宽。如果再额外附着一个Nordic开发板到WSL,会导致Thread RCP无响应,进而导致OTBR配置失败。

部分docker exec -it otbr ot-ctl xxxx命令会返回:

1
connect session failed: No such file or directory

因此最好确保只有2个52840 dongle连接到WSL。


在WSL2中搭建Matter CHIP Tool环境
https://jayant-tang.github.io/2025/09/6376457096fe/
作者
Jayant Tang
发布于
2025年9月24日
许可协议